In this article:
Overview
In this article we are going to step through the workflow creation process, build a workflow from scratch and then deploy it to a test collection and observe the result.
For this example we are going to create a very simple workflow that will create a new file, check that the file was created successfully and then write the local machine's IP address to the new file.
Creating the Workflow
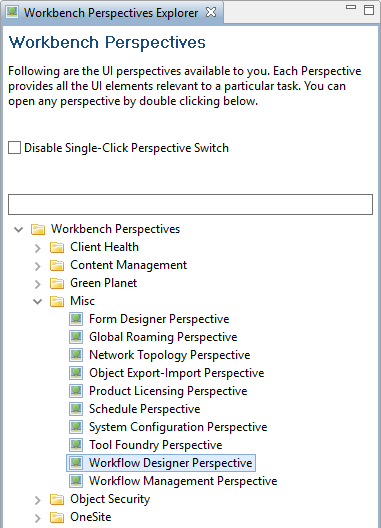
To begin, in the Adaptiva Workbench, navigate to the Misc folder and select the Workflow Designer Perspective.
The workflow designer will open and we're ready to start creating our first workflow.
To understand the workflow designer and the various views and panels, please see this article.
The first decision that has to be made when creating a workflow is which type of workflow to create. Please see this article for the different types of workflow. For this example we will create a Client workflow which will later deploy to a test collection using a content push policy.
In the Workflow Object Explorer, right-click on any folder or click the icon to Create Workflow > Client
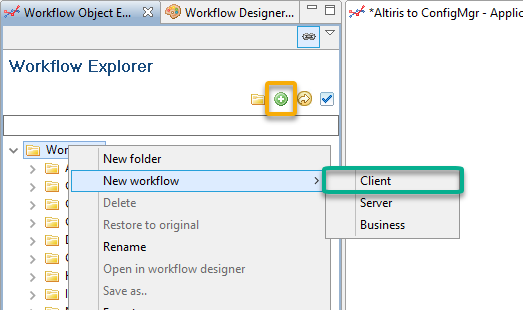
A new, empty workflow will appear in the workflow designer canvas showing just Start and End nodes.
Populating the Workflow
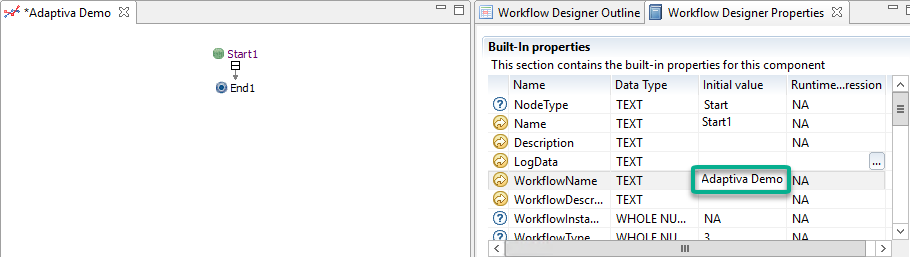
After creating the workflow, the first step that we would recommend doing is giving the workflow a name. A workflow name is required in order to save the workflow. To give the workflow a name, select the Start1 node. On the right-hand side, in the Workflow Designer Properties view, in the Initial Value column, enter text for the WorkflowName property.
After naming the workflow it is the possible to save the workflow. We would recommend saving at regular intervals during the design of the workflow to prevent data loss. To save the workflow you can either right-click on the workflow in the Workflow Explorer and click Save, or right-click anywhere in the designer canvas and select Save.
FileSystemOperations
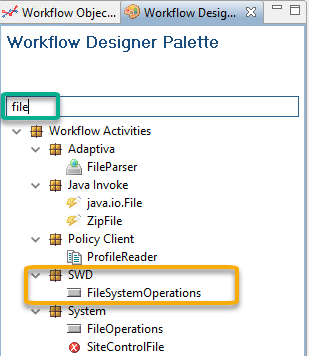
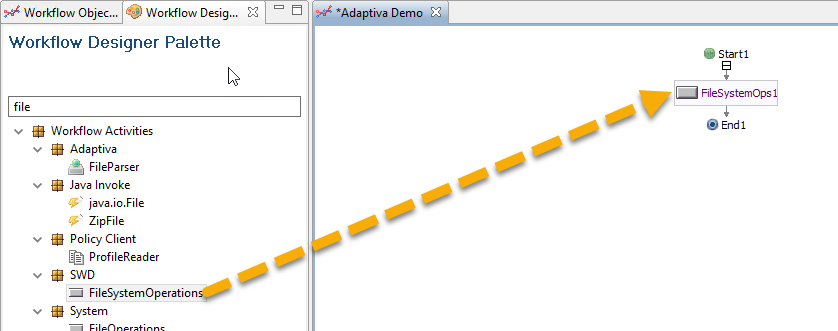
It's now time to start adding additional activities. It's useful to decide on the full purpose and function of the workflow prior to adding activities. For this example, the first action that the workflow should perform is the creation of a file. We should therefore add a FileSystemOperations activity. In the Workflow Designer Palette we can either manually browse for the desired activity or we can search by entering text into the textbox at the top of the palette.
Due to the large quantity of workflow activities available, it is usually much quicker and easier to search for the activity you are looking for.
When we have located the activity that we wish to add, we simply drag the activity onto the canvas to the desired position. As this activity is the first activity, this will simply sit between the Start1 node and the End1 node.
Note: The designer requires precise positioning of the activity. When the activity has been dragged into a position where it can be dropped, a + symbol will appear.
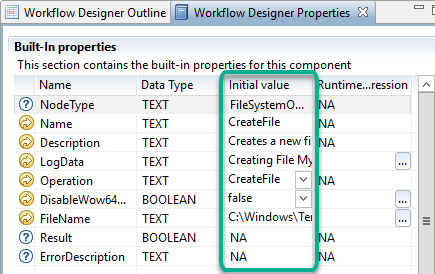
With the FileSystemOps1 activity on the canvas selected, navigate to the Workflow Designer Properties on the right-hand side. The list of properties shown relates to the selected activity. The FileSystemOperations activity has 6 properties by default:
- NodeType: Built in property that shows the type of activity. This property is for information only and cannot be modified.
- Name: The name given to the activity as it appears on the canvas. This can be changed to something more appropriate as long as it is unique on the canvas.
- Description: The user-defined description for the purpose of this activity. This can be set to something meaningful to assist in interpreting the purpose of the workflow in the future.
- LogData: This property can be used to write data into the active workflow log during execution when this activity is executed.
- Operation: Contains a drop-down list of possible operations. We will use this to choose what file system function to perform
- DisableWow64Redirection: This true/false value indicates whether the file system operation that we choose should allow the OS to redirect operations that target 64-bit folders (such as C:\Windows\System32 or C:\Program Files into their corresponding 32-bit folder on 64-bit machines C:\Windows\SysWow64 or C:\Program Files (x86)). If this setting is true then on 64-bit machines, file system operations will target the 64-bit paths. On 32-bit machines this setting has no effect.
We are going to assign the following properties:
Name: CreateFile
Description: Creates a new file called MyTestFile.txt in C:\Windows\Temp
LogData: Creating File MyTestFile.txt
Operation: CreateFile
DisableWow64Redirection: false
You will notice that when changing the Operation to CreateFile, additional properties are displayed that allow us to specify input values for what to name the file and output values for the result of the operation and if an error occurred, a description of the error.
FileName: C:\Windows\Temp\MyTestFile.txt
If we were to save and run the workflow at this point, a new file would get created called MyTestFile.txt in C:\Windows\Temp.
If-Else
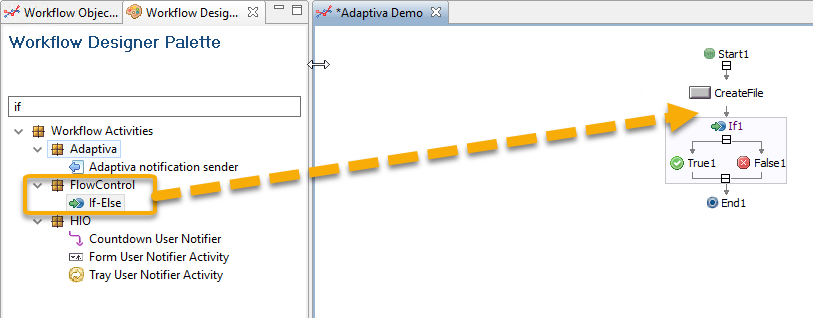
We next want to check and make sure that the file was created successfully. In order to do this we need to add logic to check the Result property of the FileSystemOperations (CreateFile) activity.
We can search for If-Else or locate it in the FlowControl category in the Workflow Designer Palette and then drag it directly below the CreateFile activity on the canvas.
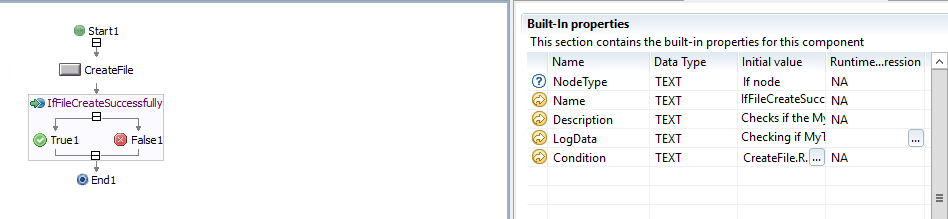
With the If1 activity on the canvas selected, navigate to the Workflow Designer Properties on the right-hand side. The list of properties shown relates to the selected activity. The If-Else activity has 6 properties by default:
- NodeType: Built in property that shows the type of activity. This property is for information only and cannot be modified.
- Name: The name given to the activity as it appears on the canvas. This can be changed to something more appropriate as long as it is unique on the canvas.
- Description: The user-defined description for the purpose of this activity. This can be set to something meaningful to assist in interpreting the purpose of the workflow in the future.
- LogData: This property can be used to write data into the active workflow log during execution when this activity is executed.
- Condition: This is the condition to be evaluated at runtime. The condition must result in a boolean (true/false) value. If the result of the condition is true, then the workflow will flow down the True1 branch. If the result of the condition is false, then the workflow will flow down the False1 branch.
We are going to assign the following properties:
Name: IfFileCreateSuccessfully
Description: Checks if the MyTestFile.txt file was created successfully
LogData: Checking if MyTestFile was created successfully
Condition: CreateFile.Result
You will notice that for the Condition, we are checking the Result property of the CreateFile activity. This done using dot notation (ActivityName <dot> Property). Because the Result property of CreateFile is already a boolean value we do not need to specify anything else. This is the equivalent of specifying CreateFile.Result = true which would also work. Either are acceptable. If we wanted to instead check whether the file creation failed, we would use CreateFile.Result = false.
We can then put all remaining activities inside either the True1 or False1 nodes depending on whether we want them to execute if the file was created successfully or if it failed.
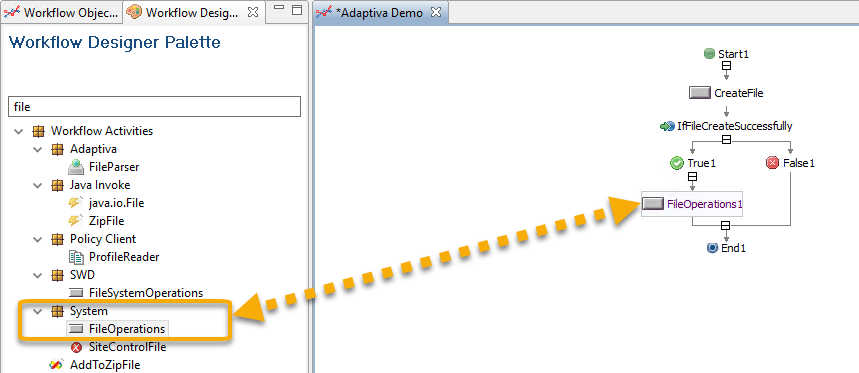
FileOperations - Open file
The next thing we want our workflow to do if the file was created successfully is to write the IP Address of the local machine to that file. In order to do this the first thing we must do is open the file for writing. To open the file we use the Open file operation of the FileOperations activity.
Note the difference between FileOperations and FileSystemOperations used earlier.
We drag the FileOperations activity directly under the True1 node of the IfFileCreateSuccessfully node.
With the FileOperations1 activity on the canvas selected, navigate to the Workflow Designer Properties on the right-hand side. The list of properties shown relates to the selected activity. The If-Else activity has 6 properties by default:
- NodeType: Built in property that shows the type of activity. This property is for information only and cannot be modified.
- Name: The name given to the activity as it appears on the canvas. This can be changed to something more appropriate as long as it is unique on the canvas.
- Description: The user-defined description for the purpose of this activity. This can be set to something meaningful to assist in interpreting the purpose of the workflow in the future.
- LogData: This property can be used to write data into the active workflow log during execution when this activity is executed.
- DisableWow64Redirection: This true/false value indicates whether the file system operation that we choose should allow the OS to redirect operations that target 64-bit folders (such as C:\Windows\System32 or C:\Program Files into their corresponding 32-bit folder on 64-bit machines C:\Windows\SysWow64 or C:\Program Files (x86)). If this setting is true then on 64-bit machines, file system operations will target the 64-bit paths. On 32-bit machines this setting has no effect.
- Operation: Contains a drop-down list of possible operations. We will use this to choose what file operation to perform
You will notice that when changing the Operation to Open file, additional properties are displayed that allow us to specify input values for what to name the file, what creation rule to use and gives output values for the file object of the opened file, the result of the operation and if an error occurred, a description of the error.
The creation rule refers to whether to just open an existing file, or whether to create a file prior to opening. As we have already created the file in the previous step, we simply wish to open the file for writing so we use Always open.
We are going to assign the following properties:
Name: OpenFile
Description: Opens the previously created file for writing
LogData: Opening the file
DisableWow64Redirection: false
Operation: Open file
FileName: CreateFile.FileName
CreationRule: Always open
You will notice that for the FileName we are using another property of the CreateFile activity - the FileName property. We could instead manually type in the file name (C:\Windows\Temp\MyTestFile.txt) again, but by specifying this property it allows us to carry this through from the previous activity and if we need to change it in the future, we only need to change it in one place - on the CreateFile node.
Also notice that we are specifying this in the Runtime expression rather than the initial value as this references a different activity.
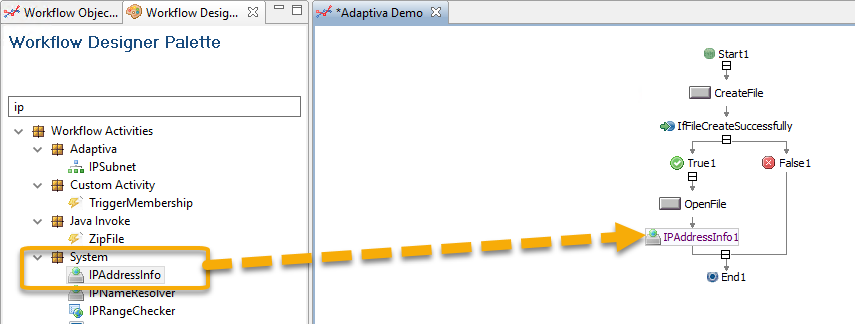
IPAddressInfo
At this point we need to acquire the data that we are going to write into the file. The data that we intend to write is the IP Address of the local device. We are therefore going to drag on an IPAddressInfo activity directly after the OpenFile activity.
This activity does not require us to specify any input properties. Instead it has a large number of output properties that list things such as the MacAddress, Subnet Address and Mask, Gateway, DNS Servers etc. The only information that we're actually after however is the IpAddress.
We shall fill in the following optional fields:
Name: GetIPAddress
Description: Acquires the IP Address for writing
LogData: Retrieving IP Address
Note: This activity also supports a RemoteTarget input property, however for this example we are just going to use the local machine so this property will not be populated.
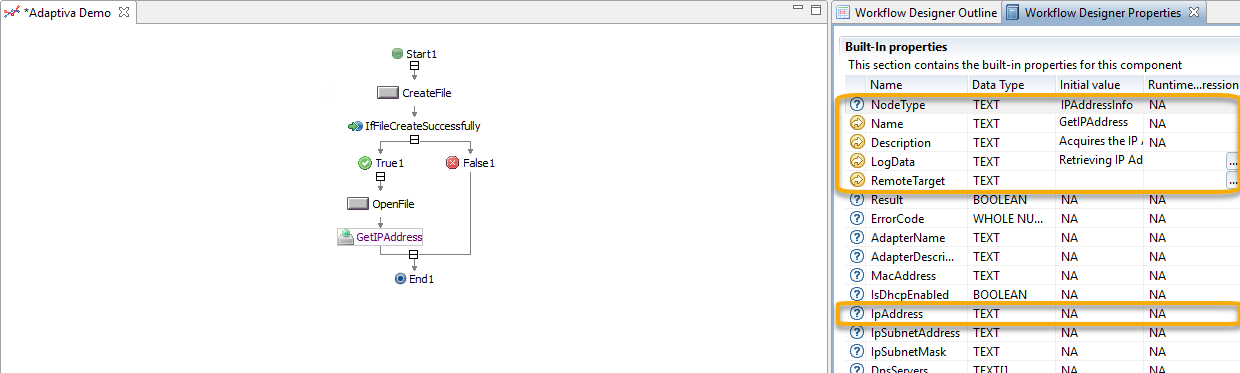
We can now reference the IP Address of the local machine by using GetIPAddress.IpAddress
FileOperations - Write Line
Now that we've opened the file for writing and acquired the IP Address, we can write the IP into the file. To do this we drag on another FileOperations activity and choose the Operation Write line.
The other properties will have the following values:
Name: WriteIPAddress
Description: Write the IP Address to the file
LogData: Writing IP to file
DisableWow64Redirection: false
Operation: Write line
File: OpenFile.File
Line: GetIPAddress.IpAddress
Please note that File property is a JAVA OBJECT data type and requires us to specify the file object that was returned by the OpenFile activity previously. We use OpenFile.File for this.
Please also note that for the Line property we are specifying the IpAddress property of the previous GetIPAddress activity. This will simply write the IP Address as a text string into the file.
Both OpenFile.File and GetIPAddress.IpAddress reference properties from previous activities so we must use the Runtime expression column rather than the Initial value for specifying the values.
Because we are using Write line, any text we enter will automatically contain a carriage return and any subsequent text will be written to the line below. If we didn't want this carriage return we could choose the Operation Write text instead.

FileOperations - Close File
The final thing we need to do is close the file so that it's not left open for writing. For this we just drag on one more FileOperations activity and set the following properties:
Name: CloseFile
Description: Closes the File
LogData: Closing File
DisableWow64Redirection: false
Operation: Close file
File: OpenFile.File
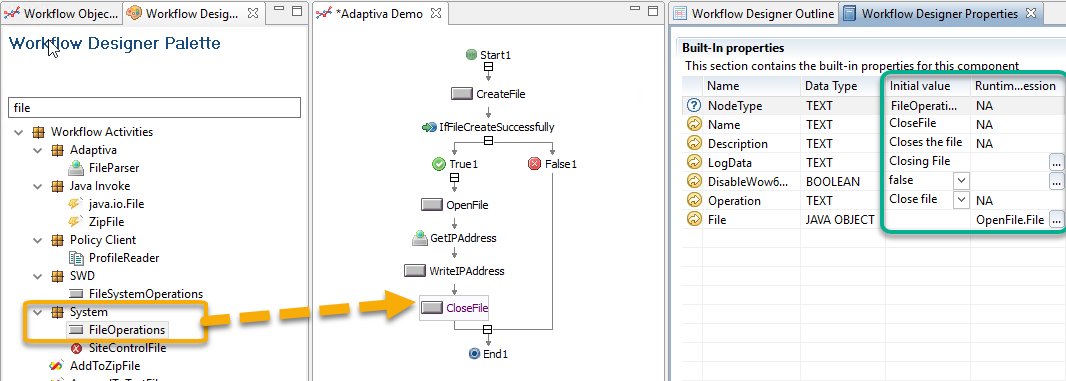
After adding this activity and setting the properties we now have a completed workflow that we can save, deploy and test.
Saving and Deploying
With the workflow complete, we have to save the workflow. Either right-click on the workflow in the Workflow Explorer and click Save or right-click anywhere on the designer canvas and select Save.
Saving the workflow will save the workflow design and metadata but will not make it available for distribution. In order for it to be distributed it must first be 'Deployed' into the system which is similar to 'Compile'. Right-click on the workflow in the Workflow Explorer and select Deploy.
Note: Deploying a workflow does not send it to any clients, it just makes it available for use.
It is also possible to combine the Save and Deploy actions by using the Save and Deploy menu item instead of running the individually.
After clicking Deploy or Save and Deploy, the following window will appear. We would always recommend enabling logging by ticking the Enable Logging tickbox and then selecting a suitable level of logging.
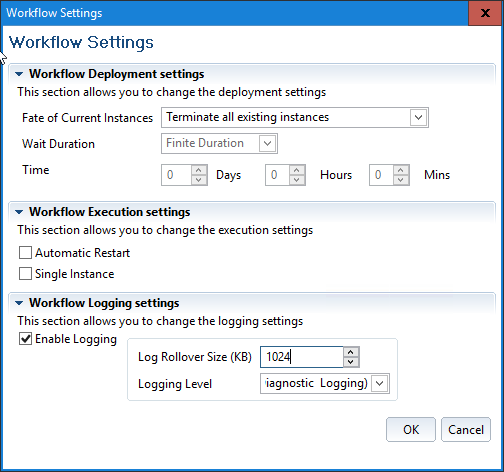
With the desired values set, click OK to deploy the workflow.
Distributing the Workflow
For Business workflows, we could launch directly from the workflow explorer but for client workflows we must attach to a policy.
The true power and functionality of workflow deployment can be obtained by leveraging the Adaptiva Client Health product. This supports individual client deployment, deployment to collections, scheduling and full status reporting. However, for this example we are going to use OneSite to deploy the workflow using a simple content push policy.
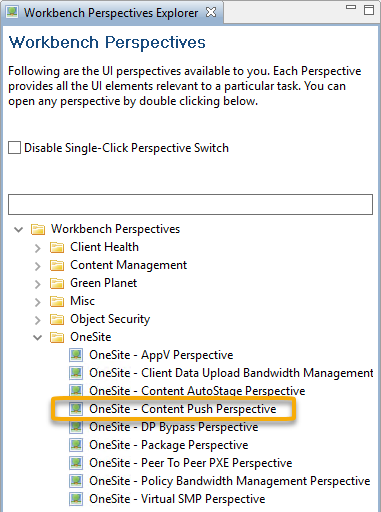
From the Home perspective in the Adaptiva Workbench, navigate to the OneSite folder and select the OneSite - Content Push Perspective
When the perspective loads up, in the Content Push Policy Explorer in the top-left, right click on Content Push Policies and select Create New Content Push Policy, or click on the icon at the top of the explorer.
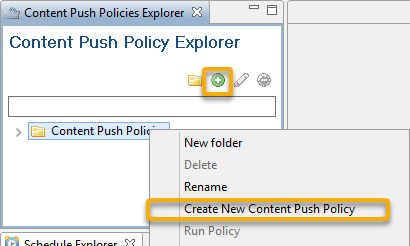
A new content push policy will open.
In the main Content Push Policy Settings window in the middle of the screen there are four tabs:
- General
- Content List
- Advanced Content Push Settings
- Policy Workflows
We are just going to be working with two of them - the General and the Policy Workflows tabs.
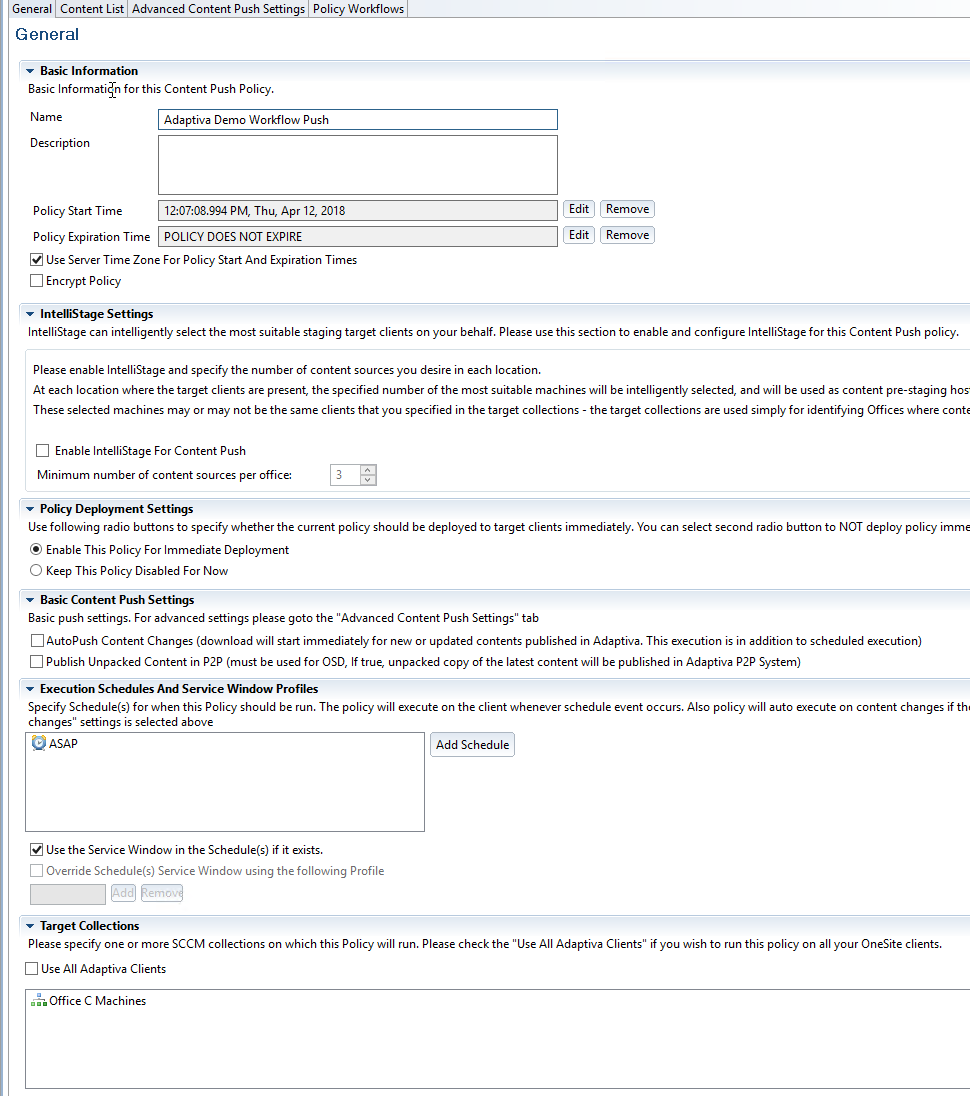
On the General tab, fill in the following fields:
Name: <any name> Adaptiva Demo Workflow Push
Enable IntelliStage For Content Push: Unticked
Enable This Policy For Immediate Deployment
AutoPush Content Changes: Unticked
Publish Unpacked Content in P2P: Unticked
Execution Schedules And Service Window Profiles: Add ASAP
Target Collections: <choose suitable test collection>
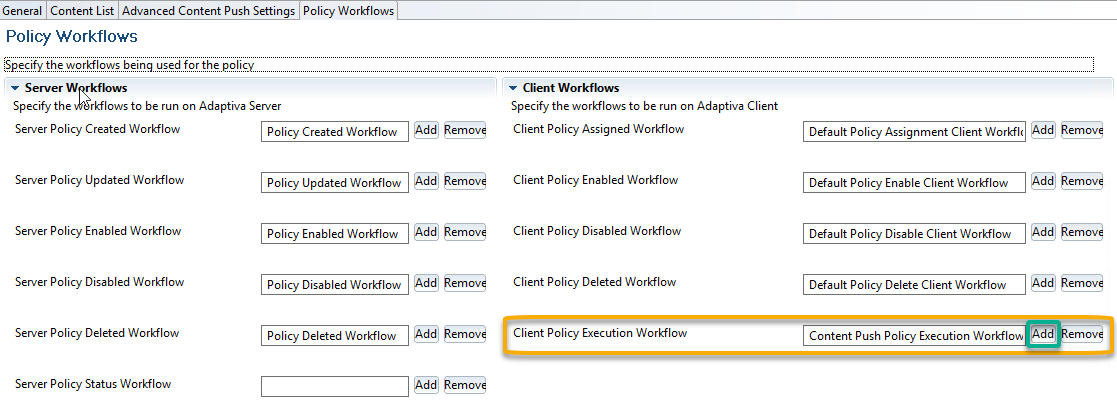
On the Policy Workflows tab, we will just change one workflow.
On the right-hand side, in the Client Workflows section, at the bottom, for the Client Policy Execution Workflow select Add.
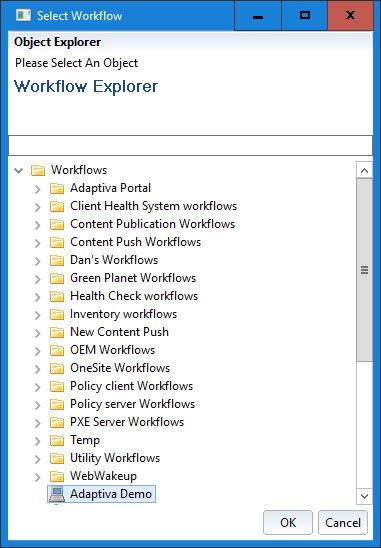
In the window that pops up, select the client workflow that we created earlier and click OK.
In the Content Push Policy Settings window, ensure the Client Policy Execution Workflow now shows the correct workflow to execute and select Save from the top toolbar.
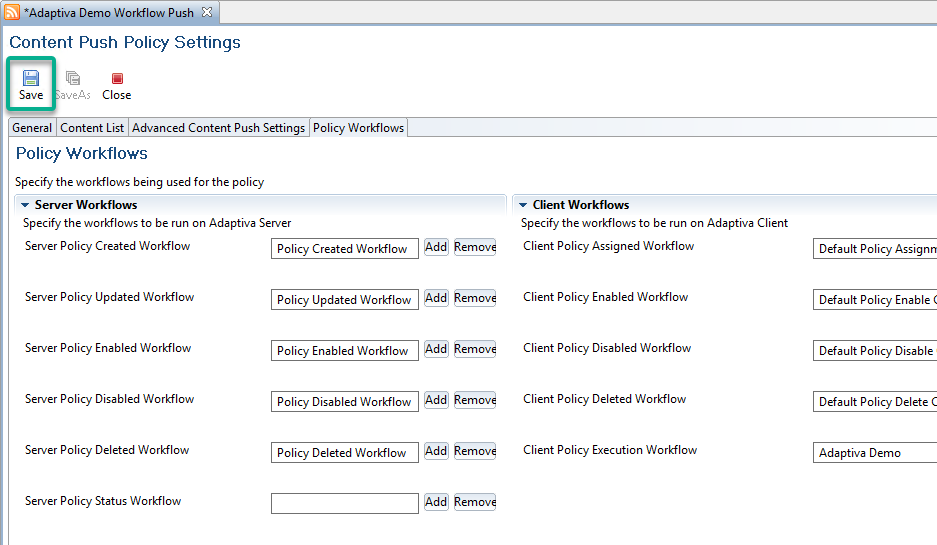
After clicking Save, a policy will sent to the machines in the target collection and the workflow will execute.
Validating the Results
In order to check the execution of the workflow and to verify the results we need to go to one of the machines that was targeted via the target collection in the previous section.
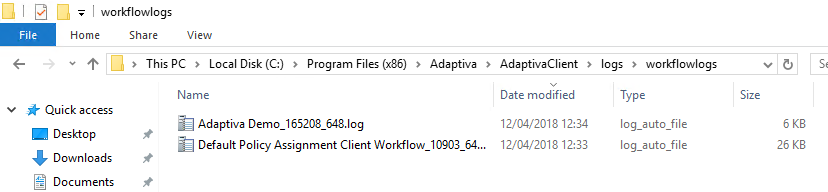
The first thing we can check is that the workflow ran. If we look in the workflow logs folder (Default: C:\Program Files (x86)\Adaptiva\AdaptivaClient\logs\workflowlogs) we should see two new files created:
Default Policy Assignment Client Workflow and one with the same name as the workflow we created earlier (i.e. Adaptiva Demo)
If we look in the Adaptiva Demo workflow we should see that the last line says Terminated By[:Normal Termination]. This indicates that the workflow ran successfully.
We also see a log line for the different activities and properties that ran during execution. If we filter the log on the word logger we can see all of the LogData entries that we specified on each of the activities that we added at design time:
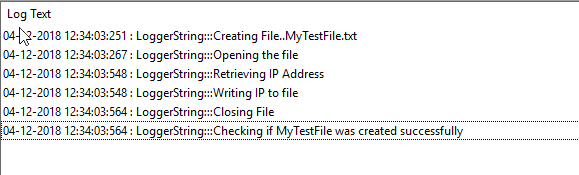
The log indicates that the workflow ran successfully so now we can validate the result of the workflow execution itself and check that the file that we asked the workflow to create is present and that it contains the desired data, the IP Address of the local machine.
If we browse to C:\Windows\Temp we should see a file called MyTestFile.txt and if we open it we should see a single log line that contains the IP Address of the local machine:
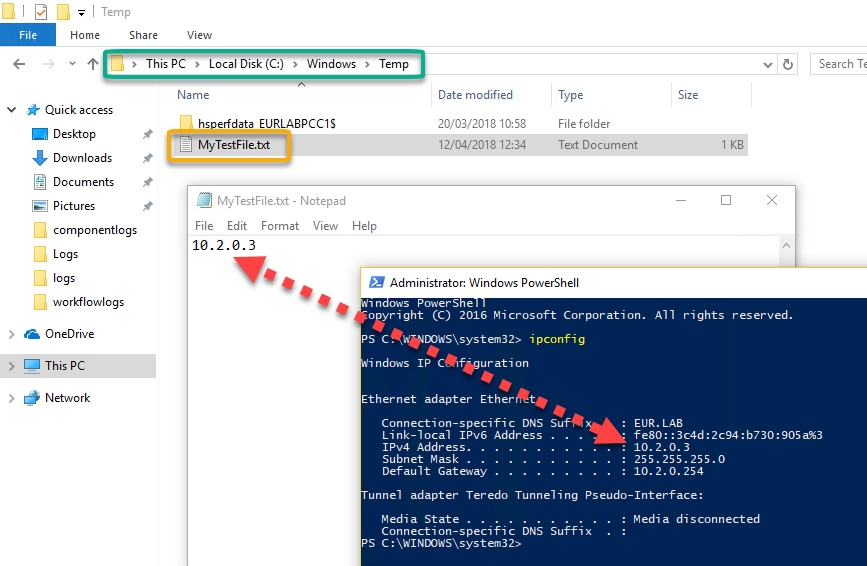
This test validates that the workflow ran successfully and that it performed all of the actions that we designed the workflow to do.
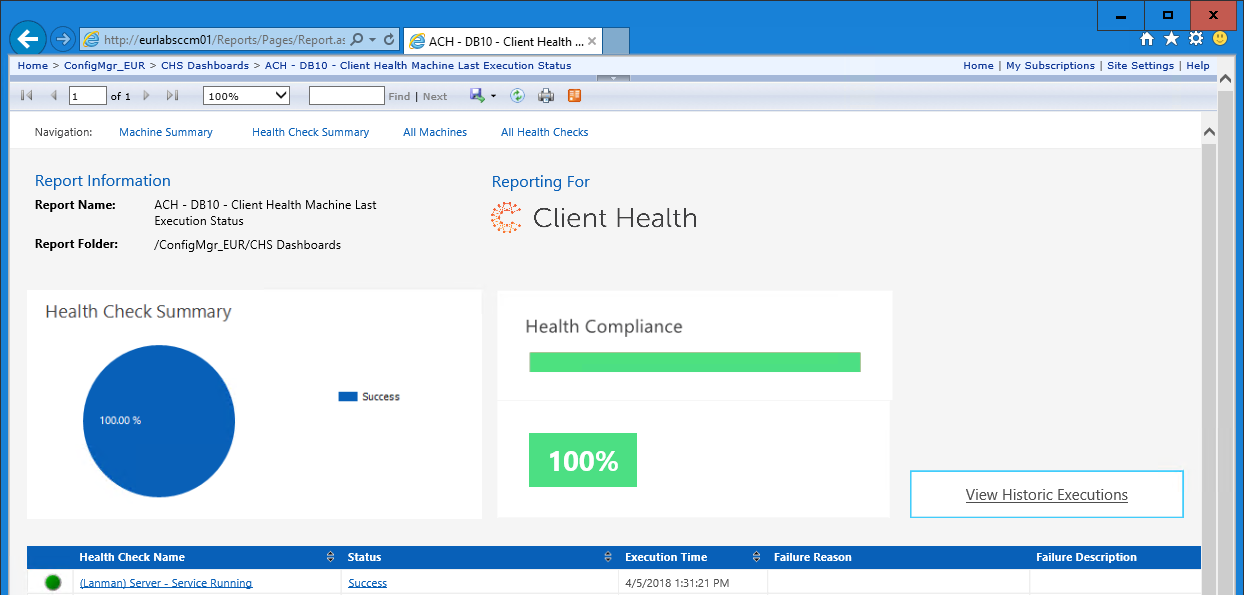
If we were to use Client Health instead of OneSite to deploy the workflow we would also have instant results come back to the workbench to indicate success or failure, a failure message in the result of failure and we would have a full reporting dashboard where we could see additional details such as below:
The workflow used in this article can be downloaded from the link below. Import the obex file using the Object Export-Import perspective in the Adaptiva Workbench.
Comments
0 comments
Please sign in to leave a comment.