In this article:
Overview - Basic overview of the REST API Foundry
Creating a REST API Workflow - How to author a workflow that can be invoked by a REST API call
Global REST API Settings - Understanding the global REST API settings
Creating a REST API Endpoint - How to author a new REST API endpoint in the web UI
Invoking the REST API - How to invoke the REST API
Further Information - Where to go for further information
Overview
The Adaptiva REST API foundry is a powerful new addition to the Adaptiva foundries collection. It allows administrators to publish workflows as REST API endpoints and to invoke them from external applications.
This provides the ability to integrate with all parts of the Adaptiva product set; to pull data, and to perform tasks on the Server and on Clients.
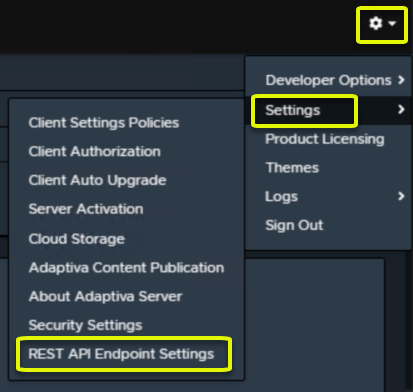
To use the REST API foundry, you will require a specially configured workflow and a REST API endpoint. To access the REST API settings, in the top right of the web UI, select the cog icon, then navigate to Settings and then REST API Endpoint Settings.
Creating a REST API Workflow
For information on how to author workflows, please refer to this guide.
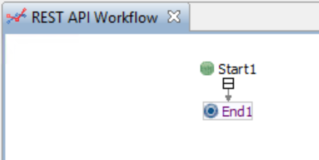
REST API workflows require a Server workflow. Start by creating a new server workflow and naming it appropriately.
For this example, we will be creating a new server workflow called REST API Workflow.
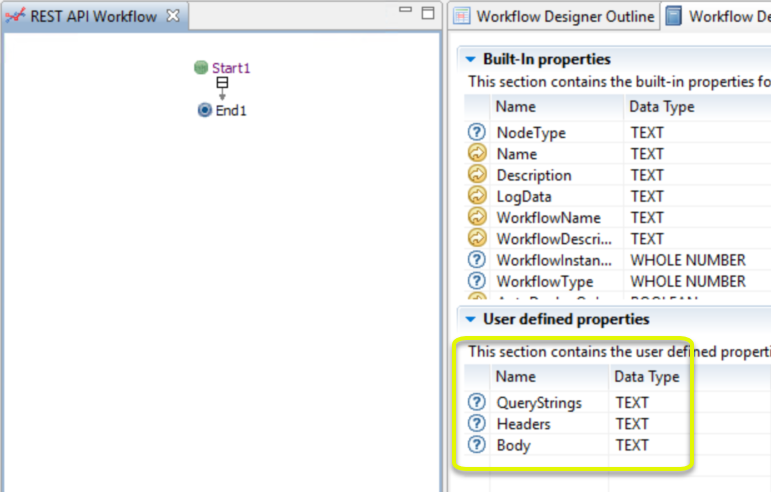
REST API workflows also require three user-defined properties be added to the Start1 node:
- QueryStrings - used to receive any query parameters passed on the URL of the request
- Headers - used to pass through any request headers
- Body - used to pass the body of the request
Add three TEXT user defined properties with the names QueryStrings, Headers and Body.
Important: These strings must match exactly, including character casing and data type.
When the workflow is invoked through the REST API call, these three properties will be populated with their respective JSON strings.
In order to be able to query these strings, we can convert them to a dictionary object and then query the dictionary for a specific key.
For example, let's say the API passes a query parameter with the name Hostname and the value MYCOMPUTER, in order to retrieve this from the JSON, we first add a JsonConverter activity and choose the operation JsonToDictionary.
In the Runtime expression for the Json propert we specify Start1.QueryStrings to pass the QueryStrings JSON string into the dictionary.

At this point we now have a dictionary object (JsonConverter1.Dictionary) that holds all of the QueryStrings that have been passed in.
We know that we want to retrieve a QueryString called Hostname so we can add another activity to retrieve that specific key.
Here we will add a new Dictionary activity and choose the operation Get.
For the InputDictionary object, we will specify a runtime expression of JsonConverter1.Dictionary.
For the Key, we'll provide the name of our QueryString (Hostname) and tell it that the data type for that property is Text.
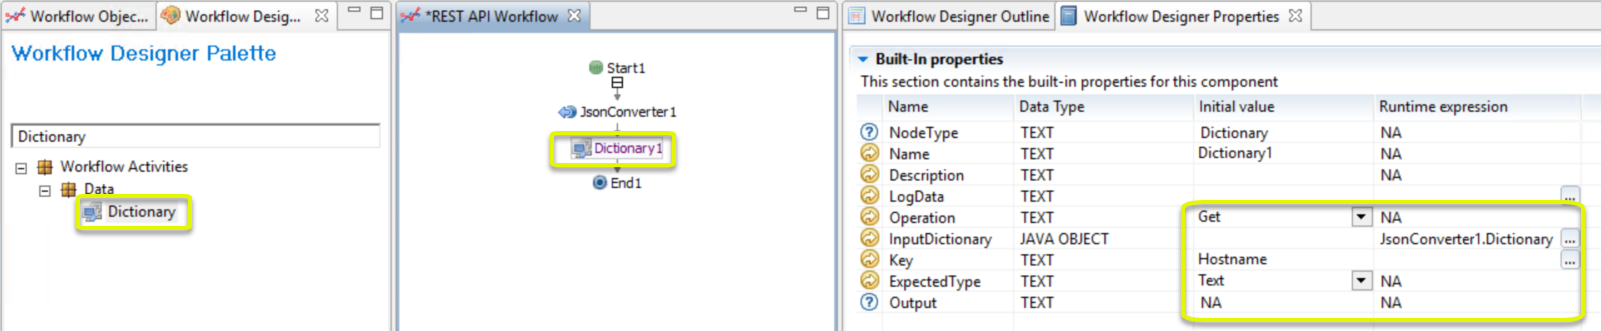
If the dictionary contains a QueryString that matches the key name Hostname then the value will be stored in the output property called Output.
We can then reference that value in other areas of our workflow.
For this example, we are simply going to return a text string that reads:
"You have passed in the Hostname of: " + Dictionary1.Output
To return data, use the following End1 node properties:
- ResultWholeNumber: This will represent the HTTP response code (e.g. 200 for success)
- ResultText: This will be the response message that gets returned by the API.
- ResultArrayOfText: This will be the response headers which can include many attributes, including the content type to properly render the returned data.
We simply add the above line to the runtime expression for the ResultText field of our End1 node. We will also give the ResultWholeNumber an initial value of 200 to return success.
Global REST API Settings
In order to use REST APIs, the REST API system must be enabled. This is done via the Global REST API settings configuration.
From within the REST API Endpoint Settings screen, select the Configuration tab:

To enable the REST API system, ensure that the Rest Server Enabled toggle is set to ON.
RSA encryption can be enabled either on a global basis, or on a per-endpoint basis. To enable globally, select one or both of the RSA-256 and RSA-512 checkboxes, and then enter the Public Key in the textbox.
For this example, the APIs will use public APIs and so no encryption will be specified.
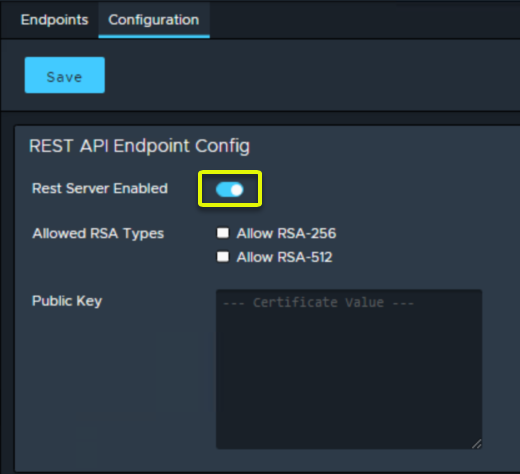
Once enabled, and optionally, encryption settings have been defined, click the Save button at the top.
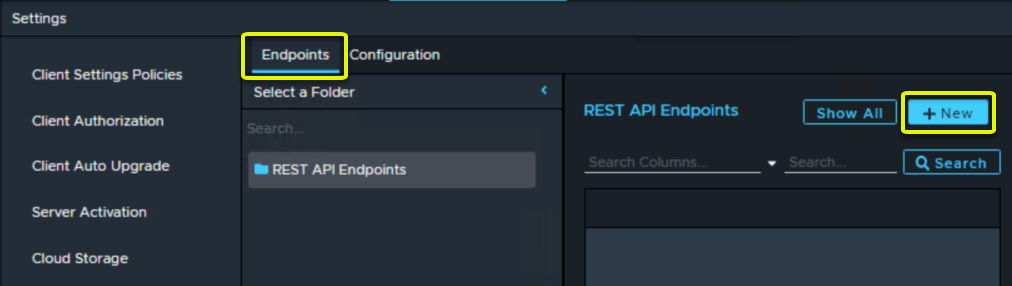
Creating a REST API Endpoint
From within the REST API Endpoint Settings screen, select the Endpoints tab. Then click the +New button in the top right to create a new REST API Endpoint.
Give the REST API Endpoint a Name and optionally, a Description. These are just identifiers and do not impact how the API gets called.
In the REST API Endpoint Details section, enter a REST API Endpoint Path. This will be the path that is used to invoke the REST API so should be given a meaningful name that will be called during invocation.
For the Authentication Type, choose between JSON Web Token (JWT) or Public (no encryption).
If using JWT authentication, choose between using the Global REST API Settings or defining the settings just for this API.
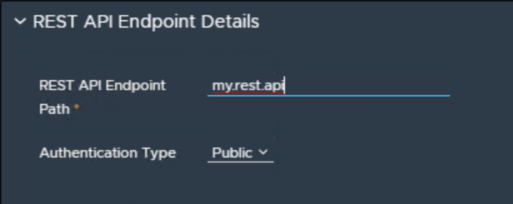
For this example we are using a REST API endpoint name of my-rest-api and public authentication.
In the HTTP Methods section, individual workflows can be assigned for when the REST API endpoint is invoked using a GET, POST, or PUT request. Select the workflow(s) appropriate for these request types.
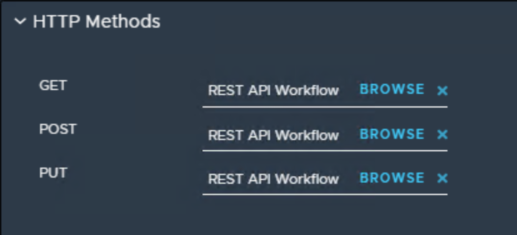
For this example, we are using the same REST API workflow for all three request types. The REST API Workflow that we authored in the Creating a REST API Workflow section.
Once all the settings have been specified, click Save at the top to save the REST API endpoint and make it available for invocation.
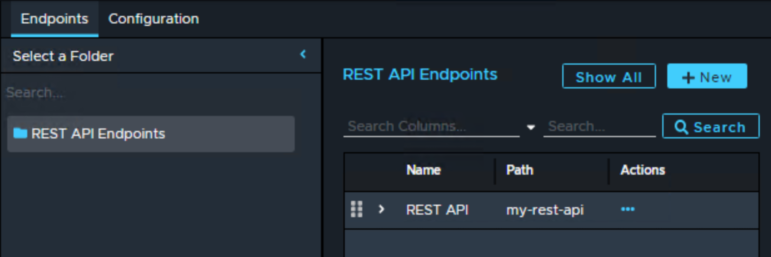
The REST API Endpoint browser should now show the newly created REST API endpoint:
Invoking the REST API
To invoke the rest API, the following path should be used:
<Your_Server_Web_UI_URL_and_port>/restapifoundry/<api_path>
Example 1: Server called MyServer, installed in HTTP mode, on the default port, and an API with the path my-rest-api:
http://MyServer/restapifoundry/my-rest-api
Example 2: Server called MyServer, installed in HTTPS mode, on port 8080, and an API with the path my-rest-api:
https://MyServer:8080/restapifoundry/my-rest-api
Specifying Query Parameters
Query parameters are parameters that are passed on the URL.
To specify query parameters which will be passed to the QueryStrings workflow property, use the following format:
...?<Key>=<Value>
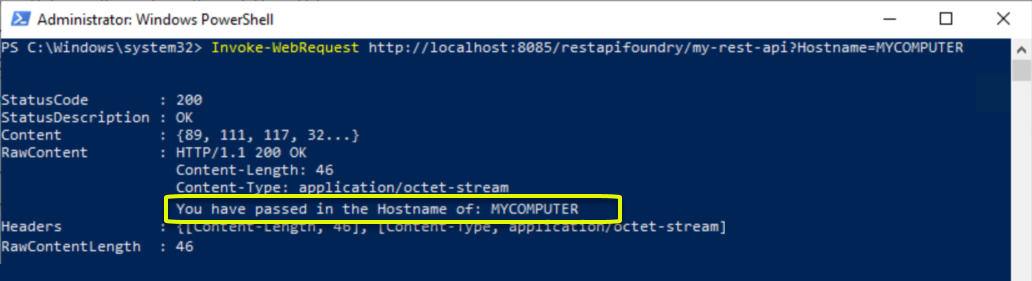
For example, to pass a property called Hostname with a value of MYCOMPUTER:
http://MyServer/restapifoundry/my-rest-api?Hostname=MYCOMPUTER
Specifying Headers
Headers can be added to the request which will not form part of the URL. These headers will be passed to the Headers workflow property.
Headers can be added using whichever tool or language is being used to send the REST API request.
Specifying Body
The request body can be added to the request which will not form part of the URL. The body will be passed to the Body workflow property.
The body can be added using whichever tool or language is being used to send the REST API request.
REST API Response
When the REST API call is made, the workflow will execute and perform whatever logic has been defined in the workflow.
The response will use three of the workflow End node properties:
- ResultWholeNumber: This will represent the HTTP response code (e.g. 200 for success)
- ResultText: This will be the response message that gets returned by the API.
- ResultArrayOfText: This will be the response headers which can include many attributes, including the content type to properly render the returned data.
For testing REST API calls, various tools can be used, including PowerShell, Postman, and others.
When we invoke our example REST API endpoint and workflow using PowerShell and passing in our Hostname=MYCOMPUTER query parameter, we can see that we get back the desired output:
Further Information
For further information, please see the other resources in the Technical Reference Library or speak to a member of Adaptiva Support.
If you experience any issues or suspect there is a bug in any part of the REST API foundry, please log a support ticket and a member of the Adaptiva support team will be touch as soon as possible.
Comments
0 comments
Article is closed for comments.